nginx
日志的时候发现大量的404
和302
尝试访问不存在的资源,大概率是使用工具扫描。{"connection": "2572288","pid": "176228","request_id": "7d5dcaac3e4be47a536a4a0d1b5c7abb","request_length": "157","remote_addr": "52.170.115.255","time_local": "08/Apr/2022:17:44:50 +0800","status":"302","host":"fengqi.me","uri":"/Panels.txt","server":"fengqi.me","port":"443","protocol":"HTTP/1.1","request_uri":"/Panels.txt","args": "","scheme": "https","request_time": "0.000","request_method":"GET","http_referrer":"","body_bytes_sent":"138","http_x_forwarded_for":"","http_user_agent":"python-requests/2.27.1","upstream_response_time":""}
{"connection": "2572337","pid": "176261","request_id": "cf56fa6708c4b68d1b8e3b4d7871103c","request_length": "150","remote_addr": "52.170.115.255","time_local": "08/Apr/2022:17:45:09 +0800","status":"302","host":"fengqi.me","uri":"/Panels.txt","server":"fengqi.me","port":"443","protocol":"HTTP/1.1","request_uri":"/Panels.txt","args": "","scheme": "https","request_time": "0.000","request_method":"GET","http_referrer":"","body_bytes_sent":"146","http_x_forwarded_for":"","http_user_agent":"python-requests/2.27.1","upstream_response_time":""}
{"connection": "2186500","pid": "164519","request_id": "aa21defaa0a590422420732b52c58f83","request_length": "253","remote_addr": "13.93.105.179","time_local": "08/Apr/2022:16:18:21 +0800","status":"302","host":"fengqi.me","uri":"/new-index.php","server":"fengqi.me","port":"443","protocol":"HTTP/1.1","request_uri":"/new-index.php","args": "","scheme": "https","request_time": "0.000","request_method":"GET","http_referrer":"","body_bytes_sent":"138","http_x_forwarded_for":"","http_user_agent":"Mozilla/5.0 (Windows NT 10.0; Win64; x64) AppleWebKit/537.36 (KHTML, like Gecko) Chrome/85.0.4183.102 Safari/537.36","upstream_response_time":""}
正常用户不会这么访问,所以基本上一个ip重复来这么几次就是有问题的,写个脚本,定时扫描nginx
的access.log
统计出频繁的ip,然后干掉。
Ngrok 官方提供的服务器因为一些原因导致可用率不高, 但是他们开源了 1.x
版本的服务器端代码(目前最新是 1.7
), 这样就可以自己搭建了.
这个比较简单, 参考官方的文件就可以, 步骤无非就是: 拿到代码, 安装 go, 进行编译.
文档地址: https://github.com/inconshreveable/ngrok/blob/master/docs/DEVELOPMENT.md
编译完成后, 执行 ngrokd -h, 输出如下:
Usage of bin/ngrokd:
-domain="ngrok.com": Domain where the tunnels are hosted
-httpAddr=":80": Public address for HTTP connections, empty string to disable
-httpsAddr=":443": Public address listening for HTTPS connections, emptry string to disable
-log="stdout": Write log messages to this file. 'stdout' and 'none' have special meanings
-log-level="DEBUG": The level of messages to log. One of: DEBUG, INFO, WARNING, ERROR
-tlsCrt="": Path to a TLS certificate file
-tlsKey="": Path to a TLS key file
-tunnelAddr=":4443": Public address listening for ngrok client
参数比较简单, 指定域名, http 端口, 日志, ssl 证书, 隧道端口.
这里有个问题就是, 80, 443 已经让给 nginx 使用了, 虽然 ngrok 能指定到其它端口, 但是在客户端连接后:
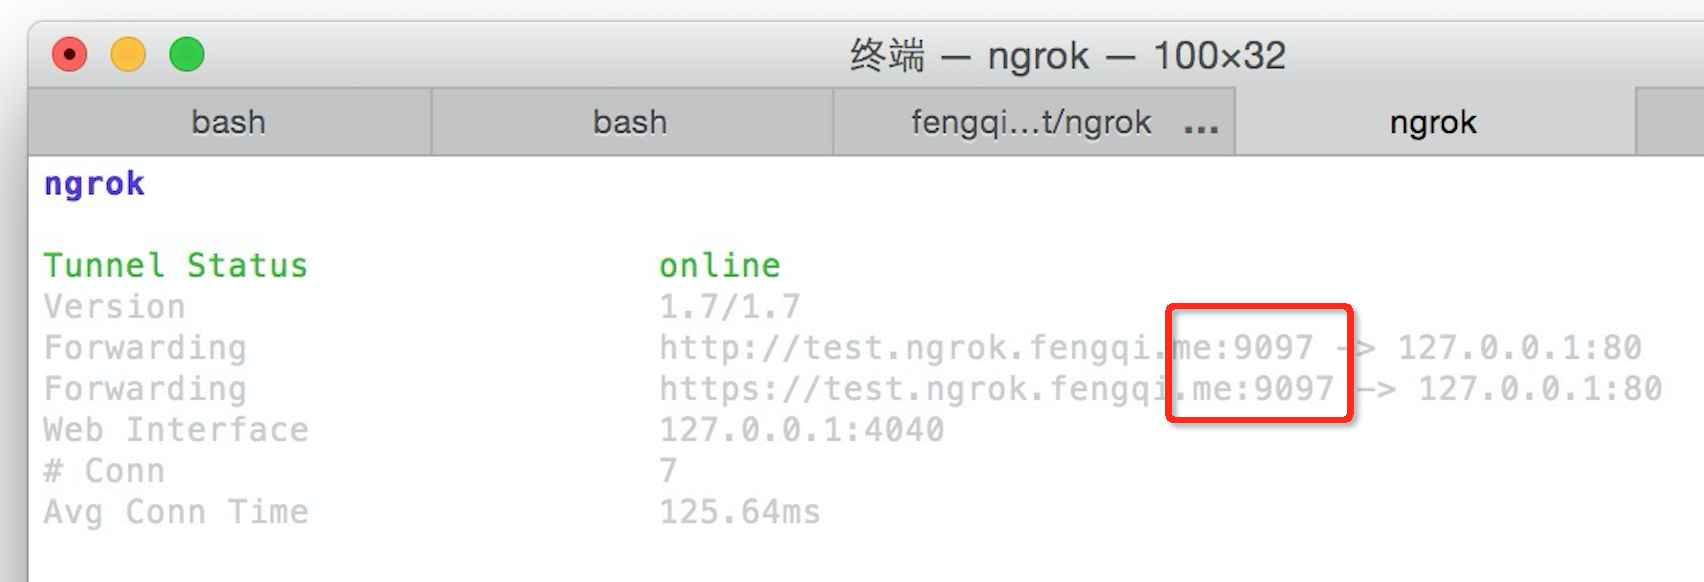
一个是 https 识别错误, 一个是访问的时候加端口麻烦, 就算用 nginx 再次代理, 但是客户端显示的端口是没有变化的.
]]>大部分都是在 Windows 下开发, 但是很多优秀的扩展和特性不被 Windows 支持,
同时很多人对 *nix 操作不熟练, 并且 vagrant 有个问题(其实是 VirtualBox 的问题)就是文件锁, 有时会导致 svn 无法提交/更新.
这里尝试给出另外一个方案, 个人觉得可行性还是很大的.
本文记录的方案只是个预案, 还没在公司实际推行.
本文演示环境使用 Ubuntu Server 14.04 和 Windows7
Nginx在启动的时候也会检查Host是否能解析?
把以下配置放到 server {} 块.
关闭favicon.ico不存在时记录日志
location /favicon.ico {
log_not_found off;
access_log off;
}
不允许访问隐藏文件例如 .htaccess, .htpasswd, .DS_Store (Mac).
location ~ /\. {
deny all;
access_log off;
log_not_found off;
}
]]>因为是在家里跑个pc, ADSL DDNS外网连接, 所以常用的21 22 3308 443 80啊这些肯定是不能直接使用啦(也为了安全), 但是又为了方便, 所以ssh nginx都要同时监听22 80 和另外的端口提供给外网链接.
ssh监听多个端口的方法很简单:
vi /etc/ssh/sshd_config
Port 22
Port 8022 #这样就行啦, 想再多个端口就这样多写几个
service sshd restart #重启sshd就ok了
当然呢, 也才可以查看上面的参考地址, 使用ListenAddress, 效果也是一样滴.
]]>那么就会出现个问题, 跑在后方 apache 上的应用获取到的访客IP都是Nginx所在服务器的IP , 或者是本机 127.0.0.1 .
最明显就是查看 apache 的访问日志.就会见到来来去去都是内网的IP.
如果你的应用有诸如, "单个IP不能重复登陆”, "单个IP注册相隔n分钟”... 之类用于IP判别的安全规则.
这么就麻烦了....
但还好, 你可以通过修改 nginx proxy 的参数令后端应用获取到 Nginx 发来的请求报文获取到外网的IP.
proxy_set_header Host $host;
proxy_set_header X-Real-IP $remote_addr;
proxy_set_header X-Forwarded-For $proxy_add_x_forwarded_for;
但这解决的问题单单只是应用上, apache 日志上所获取的ip依然还是本地.
这个时候就需要配合apache的一个第三方模块"mod_rpaf"了, 官方网站: http://stderr.net/apache/rpaf/
安装方法:
wget http://stderr.net/apache/rpaf/download/mod_rpaf-0.6.tar.gz
tar zxvf mod_rpaf-0.6.tar.gz
cd mod_rpaf-0.6
/opt/apache/bin/apxs -i -c -n mod_rpaf-2.0.so mod_rpaf-2.0.c
安装完成后在httpd.conf添加如下:
LoadModule mod_rpaf-2.0.so_module modules/mod_rpaf-2.0.so
RPAFenable On
RPAFsethostname On
RPAFproxy_ips 127.0.0.1 192.168.1.90 #Nginx所在服务器的IP.
RPAFheader X-Forwarded-For
重启apache, 再看apache的访客日志就是真实的用户ip了.
遗留问题为, SERVER_ADDR成127.0.0.1了, 求解???
yum install subversion
然后是nginx的安装:
mkdir -p /opt/soft
groupadd web
useradd http -g web -s /sbin/nologin
cd /opt/soft
wget http://sourceforge.net/projects/pcre/files/pcre/8.12/pcre-8.12.tar.gz
wget http://www.openssl.org/source/openssl-1.0.0d.tar.gz
tar zxvf pcre-8.12.tar.gz
tar zxvf openssl-1.0.0d.tar.gz
tar zxvf nginx-0.8.54.tar.gz
cd nginx-0.8.54
./configure --prefix=/opt/nginx --user=http --group=web --with-http_stub_status_module --with-http_ssl_module --with-md5=/usr/lib/ --with-pcre=/opt/soft/pcre-8.12 --with-openssl=/opt/soft/openssl-1.0.0d
make
make install
]]>